


How to Roll a Cross Joint
Posted by DaySavers Team on Jan 12th 2024
Many consider joint rolling an art form, with enthusiasts constantly seeking to refine their skills and explore advanced techniques, like mastering the intricacies of cross joint rolling—a method that transcends the conventional.
Before we embark on this journey, revisiting the fundamentals is beneficial. A primer on how to roll a joint and pre-roll packing is a prudent starting point for those unfamiliar with the basics.
Now, let's get back on track to the more challenging realm of joint craftsmanship: how to roll a cross joint. This technique is considered a huge step up in joint-rolling skills compared to the standard joint. So, our focus in this post lies in uncovering the methods that elevate a joint from ordinary to extraordinary by teaching you how to roll a cross joints yourself.
Rolling a cross joint can take several tries to master, so don't get discouraged! We'll work through it together.
What is a Cross Joint?
The cross joint stands as a testament to the evolution of joint rolling. It not only can deliver a party-size amount of cannabis in a single joint, but this intricate roll has become a bit of a statement piece for cannabis consumers to show off their joint-rolling skills.
Its cultural significance resonates, notably fueled by its portrayal in popular media, with films like Pineapple Express (2008) thrusting it into the spotlight. The cross joint, once a niche creation, has become an emblem of the stoner lifestyle, capturing the imagination of enthusiasts seeking a heightened smoking ritual.
Many cannabis consumers embrace the challenge, acknowledge the intricacies, and delve into the art of cross-joint rolling. It's not a hasty endeavor; it's a deliberate craft that, when mastered, becomes a bonafide flex for those who roll it.
So, are you ready for the challenge? Let’s get into it!
Step 0: Cross Joint Rolling Material List and Prep
1. Your Favorite Strain of Weed:- Begin with the star of the show—the strain that suits your preferences. Choose your favorite to set the tone, whether it's an indica for relaxation or a sativa for a creative boost.
- A reliable grinder is the unsung hero of joint rolling. Ensure your flower is finely and consistently ground for a smooth and even burn.
- Opt for quality large rolling papers to serve as your "fat joint" canvas. The size matters here, and you’ll need ample space to accommodate the intricacies of the cross joint.
- Smaller rolling papers for the slim joint are equally crucial, adding finesse to the overall construction.
- Precision is critical when creating holes for airflow in your joints. Whether you prefer a needle, pin, or wire, choose a tool that allows for surgical precision. Many recommend a 5mm screw for the best results.
- Sharp scissors are indispensable for cutting and shaping, especially when reinforcing and sealing your cross joint. Ensure they are clean and ready for precise action.
- For those seeking an extra layer of support and to abide by Seth Rogan's traditions, you can opt to insert cardboard into the butt end of your joint as a crutch or filter. For something more premium, you can even use glass or wood filter tips.
- Optional, of course, but you can keep your workspace organized and your materials in check with a dedicated rolling tray.
Taking the time to prepare yourself and your space, especially in grinding the flower, sets the stage for a seamless and enjoyable cross joint rolling experience. So, gather your materials, find your favorite strain, and let's roll into the next steps of this elevated joint-rolling process.
Step 1: Roll Your Fat Joint
This is going to be the main structure of our cross, so roll a larger-than-usual fat joint, emphasizing its structural integrity for the upcoming cross joint assembly. Feel free to go for a blunt-like appearance, which may make the later steps easier. It’s best to pack your joint with a packing tool or something the like to ensure it’s wholly sturdy and not flimsy.
Once completed, you can add an extra long twist at the end of your joint. Avoid packing it to the tip, leaving ample room for correct lighting once your joint is ready.
The thickness of this fat joint is essential, as it supports the two conjoined joints, so try your best to keep your roll nice and sturdy and make sure it’s wide enough that you can slide the second joint through it.
If you're a beginner, feel free to scale your fat blunt to a smaller size to make this process more manageable; finding a good middle ground is important. You can gradually work your way up to larger joints as you gain confidence in your skill of cross-joint rolling.
Cardboard Boost in Your Cross Joint (Optional):
Tweak your cross joint experience by considering a small cardboard addition to the butt end of your joint—a move popularized by none other than Seth Rogen, a key player in the cross joint scene.
This optional maneuver may be out of ritual but could have structural support benefits. Plus, it allows a more comfortable smoke, giving you something to hold on to and helping prevent flower from falling out the bottom of your cross joint.
But here's the twist—it's not a must-follow ritual. It’s all about pesonal preference. Many seasoned cross joint aficionados skip this step. The decision is yours!
Step 2: Rolling a Slim Joint:
Let's next dive into the mechanics of rolling a slim joint, a crucial step in the assembly of your cross joint masterpiece. Opt for a slender profile here; the thinner the joint, the smoother the construction process.
If this is your first attempt, consider going as thin as possible to make the next step easier. It simplifies the overall construction, making the learning curve more approachable.
Once the joint is complete, pay attention to the twists at the ends. Be careful to ensure the twist on both sides of this slim joint leaves ample room for an even light, guaranteeing a consistent burn throughout.
Because you will eventually light both ends of this slimmer joint when your cross joint is completed, there’s no need to put a cardboard crutch of filter into this one.
Step 3: Creating Holes for Cross Joint Assembly
Make a Hole in Your Fat Joint:
To begin, grab a needle (or a 5mm diameter screw for optimal results) and carefully pierce a hole about ¾ of the way up your large joint. This is where the cross will be, so don’t put it too low, but be sure to leave some room at the tip for the main, fat joint to smoke down. Precision is key, so take your time and approach it with surgical accuracy.
If a needle or 5mm screw isn't available, other sharp objects like a pencil or an exacto knife can serve the purpose. Once pierced, gently twist and shimmy your tool to slowly widen the hole within reason; we have to slide the slim joint through here so we’re aiming for functionality, not enormity.
Make a Hole in Your Slim Joint:
You are also going to need a hole though your slim joint for air flow. The hole here should be smaller than the one in the fat joint, but it should still go all the way through. If using a needle, we recommend making the hole double the size of the needle.
This small opening plays a crucial role, allowing air to flow from the tip of the fat joint, through the cross to the end of your cross joint. This is a vital step as that hole allows the smoke to travel from the tip above the cross to you when you take a hit.
Take your time with this step—there's no need to rush. Precision ensures a seamless assembly, enhancing the overall quality of your cross joint.
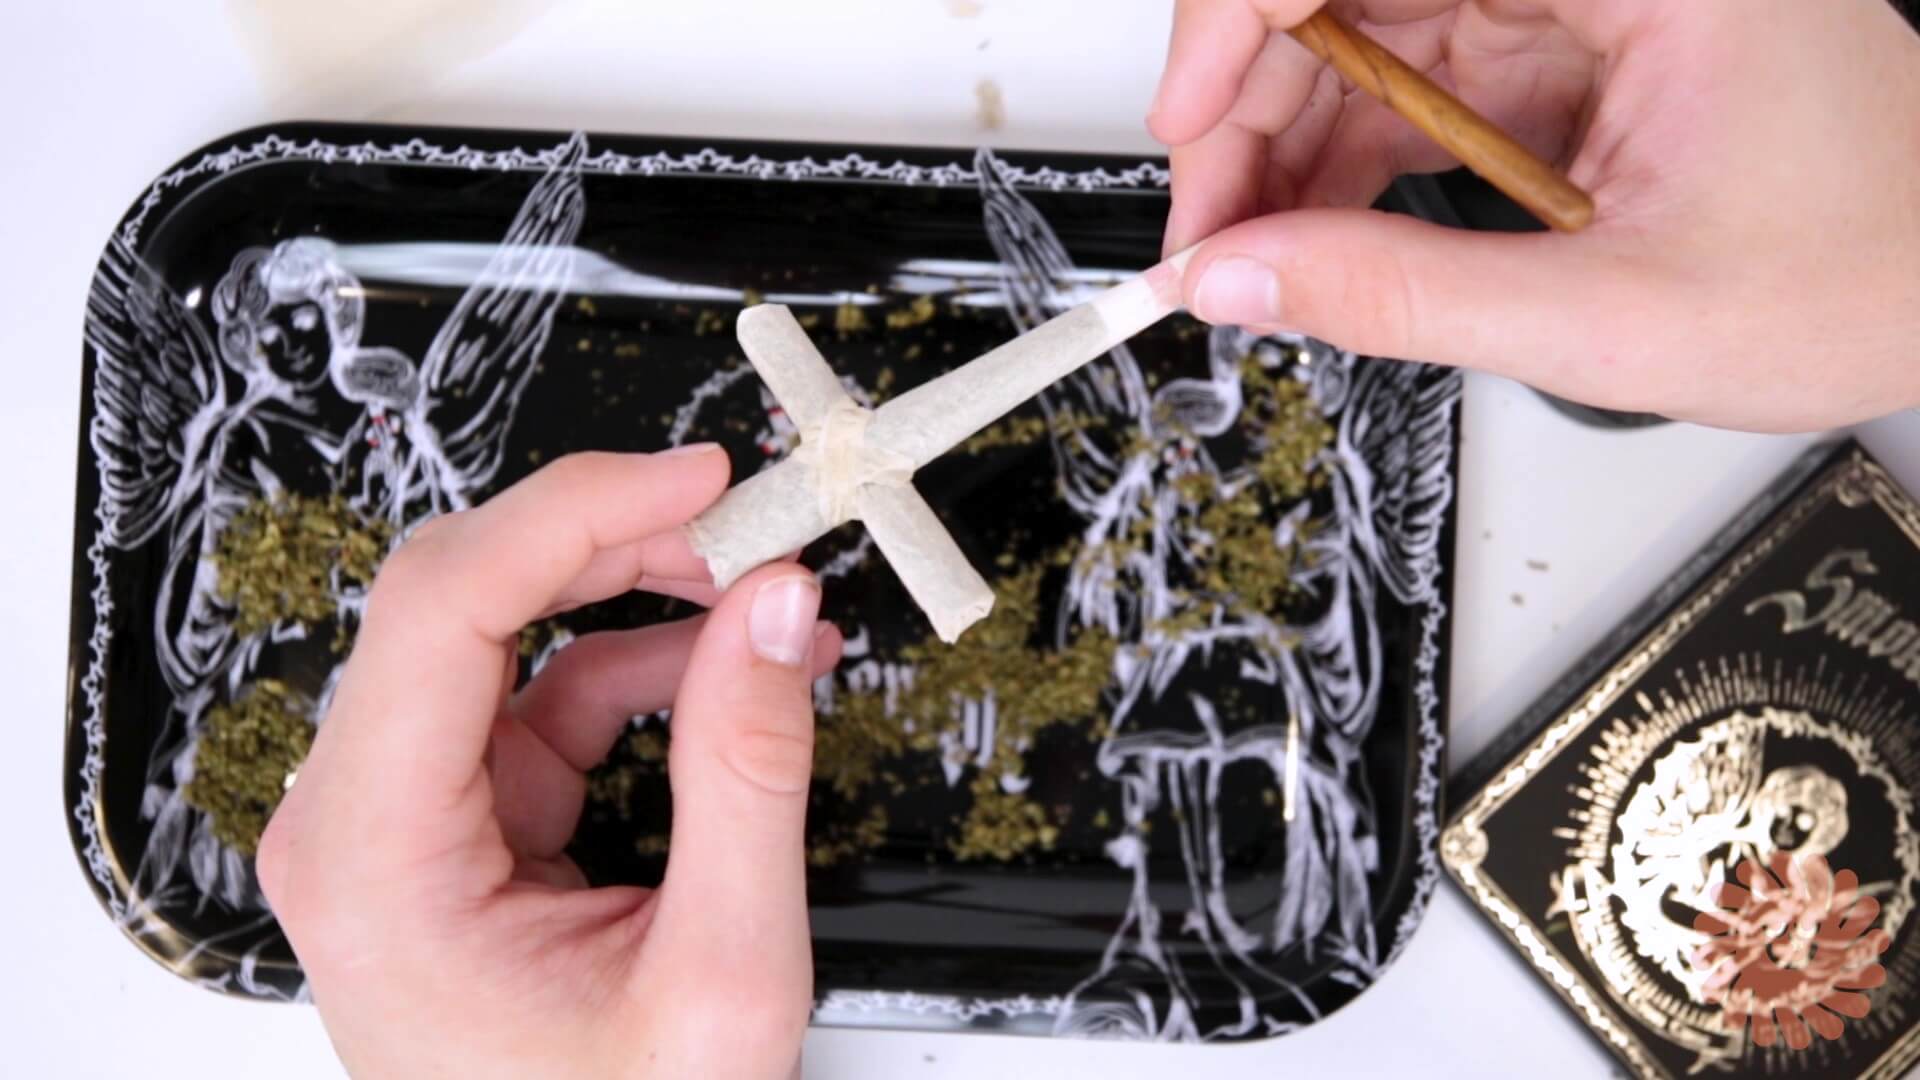
Step 4: Assembling Your Cross Joint
Bring your cross joint to life by combining your fat and slim joints.
1. Inserting the Slim Joint:Begin by inserting one end of the slim joint through the large hole in the fat joint. To ensure a smooth and even insertion, gently finagle the slim joint using a mix of motions. The key here is patience; a gradual approach ensures the joints align seamlessly.
We also recommend doing this over oyur rolling tray to collect any cannabis that may fall out of the joints at this time.
2. Finding the Right Depth:You'll know you've inserted the slim joint far enough into the fat joint when the small hole in the slim joint is fully inside the fat joint. Be careful though as you are inserting the joint to try and ensure the hole through the slim joint runs vertically through the fat joint. This alignment is critical not only for the joint's structural integrity, but overall burn quality and smoking experience.
3. Optimizing Placement:Take extra time to pay attention to the placement of the slim joint's hole. This hole must be close to the center of the fat joint and parallel to the directon of your main joint. This meticulous placement enhances the airflow within the cross joint, contributing to a more even and satisfying burn.
Pro Tip:Experiment with slight variations in insertion depth and slim joint alignment to find the sweet spot for your preferred smoking experience. The more you fine-tune this step, the better your cross joint will burn, allowing you to enjoy the fruits of your rolling prowess.
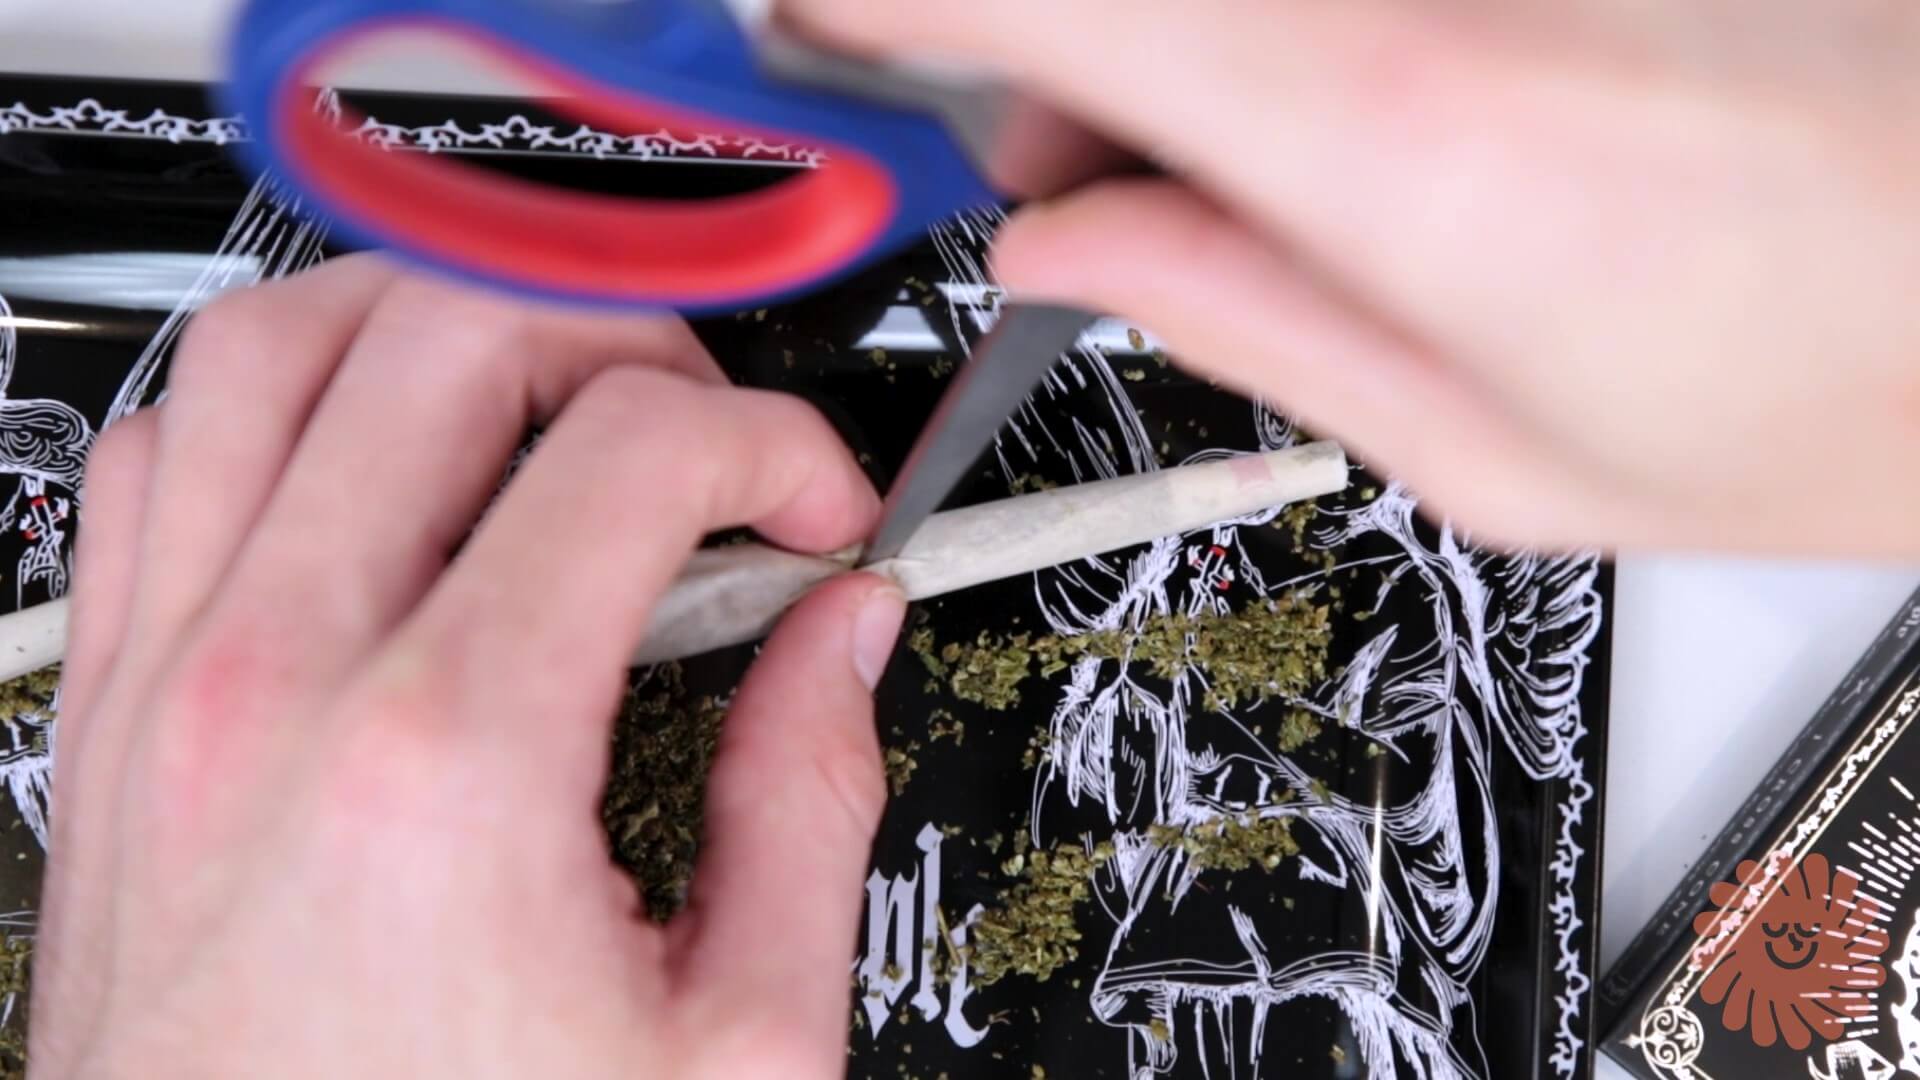
Step 5: Reinforce and Seal Your Cross Joint:

Now, let's solidify the foundation of your cross joint so it stands strong and steady throughout your session.
To bolster its structural integrity, grab two additional rolling papers. Use scissors to trim away the glue ends and then toss the rest of the paper. Next, carefully wrap those glue strips papers diagonally around the holes at intersection of your cross joint where the two joints meet. These strips aren't just for reinforcement but for creating an airtight seal.
Why is this so important? Well, without this careful sealing, you risk losing precious smoke, and the integrity of your cross joint could be compromised.
Step 6: Light Your Cross Joint
Finally, let's dive into lighting up your cross joint, which, honestly, could be one of the most challenging aspects of this process. And it’s easier with a friend, so it’s a good thing these cross joints are perfect for parties.
Equip yourself, and a friend if possible, with three separate lighters so you can light all three ends of your cross joint simultaneously. Lighting all of the twisted ends at one time will give you the best chance of lighting your cross joint evenly.
You can, of course, also light it up solo; thanks to the extra-long twists we incorporated during the rolling process, you should still have time to set up an even burn.
You may need to attend to your joint throughout your session to prevent canoeing and uneven burns, so keep your lighter handy!
Got it Down? Get Creative With Other Cross Joint Designs!
Once you’ve mastered the original cross joint you can consider upgrading and getting even more creative with your joint rolling.
There are many different ideas online, from the double cross joint to the more complicated "palm tree" or even the illusive scorpion joint; there are plenty of ways to showcase your rolling skills in new and creative ways. The only thing limiting you is your imagination!
Don't Want to Go Through All The Hassle? Check out the Smoke Temple Cross Joint Cone.
If rolling your own cross joint is looking too demanding or time-consuming, fear not! Just check out the Smoke Temple Cross Cone.
This pre-rolled cross joint is designed for easy packing and can hold up to 3 grams of flower. Simply remove the paper insert from the middle and sides and fill it with cannabisto skip the entire, intricate rolling process.
Made with slow-burning, Ultra-Fine European rolling paper that is always tested to the highest industry standards for psticides, heavyu etals and microbials, the Smoke Temple Cross Cone is a more accessible alternative to rolling your cross joint and just as impressive.
Congratulations, You’ve Learned How to Roll a Cross Joint!
And that’s it! No matter how long it took or how many tries, you've finally joined the illustrious club of cross-joint rollers! Doesn't it feel great? Now you can stunt on all your buddies with your rolling skills.
Follow these steps, experiment with the process, unleash your creativity, and break away from the norm. And who knows? You might find yourself among the next generation of great joint rollers...
Many consider joint rolling an art form, with enthusiasts constantly seeking to refine their skills and explore advanced techniques, like mastering the intricacies of cross joint rolling—a method that transcends the conventional.